12 December 2009

12 Days of Holiday Sales!


Merry Christmas from Stampin' Up!! Wo0o0o0o Ho0o0oo!!! Stampin' Up! has just kicked off a wonderful 12 days of holiday sales... featuring Big Shot Dies and Decor Elements Vinyl Sheets that can be cut using the dies and the Big Shot! Now is the time to purchase those dies you have been wanting. The discount ranges between 15% and 25%!! There is no quantity limits! Order by Dec. 15th to guarantee arrival before Christmas.

To Order Stampin' Up! Products Online 24/7, Click Here!!

Prices Listed are SALE prices...


post signature

07 December 2009

Craft Fair


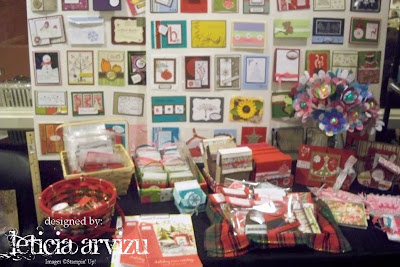
I've been MIA, because I was preparing to participate in my very first craft fair! The craft fair was held where I work, Arrowhead Regional Medical Center on Dec. 3rd & 4th. For years I had been wanting to participate. I am hoping to participate in each craft fair that is held there from here on out! The hospital has 2 fairs per year. One during Christmastime and one around Mother's day. For the weeks prior to the show, I was super busy creating! I made cards, card holders, gift card holders, gift tags, reindeer & snowman poop, layered flower lollipops and mini scrapbooks. I had lots of ambition for this show! I worked non-stop for a couple of weeks! I am here today to say that it was a success! I sold lots of items and have about 30 leads! Wo0o0o Ho0o0o0o!!! Here are a couple of pics of my table/display. I had a basket with mini candy canes for all the visitors to my table. I attached little tags to each one. The inspiration for the candy canes came from Becky Robert's blog: Inking Idaho. I visit her blog often for inspiration!! She is one awesome stamper! I look forward to crafting with all my new contacts in the new year!


post signature

19 November 2009

My very first BIA project!


Ok, I was bad... I was real bad! I had to have it! I bought a Bind-It-All! I couldn't help myself... So, I developed some pictures and decided to make my first project. For my dear daughter's 17th Birthday, we took her and some friends to Knott's Scary Farm. I decided to make a half circle album. Here it is post embellishments!

post signature

08 November 2009

Bermuda Bay Dasher

On Saturday, November 7th, I attended the last "Udderly Awesome" group quarterly meeting of 2009. This is the card that I created for the swap. I look forward to all of the quarterly meetings because it is a great time to network and to gain lots of inspiration! I was really busy and had to create something quickly. I was unsure what I wanted to make since the theme for this swap was "whatever we'd like". I figured I'd do something Christmas. I wanted to use non-traditional Christmas colors... I am really happy with the way my trade turned out. I used bermuda bay and rose red. Hope you enjoy!

post signature

Medallion Night & Day


I recently joined a Yahoo Group Called "Monthly Theme Card". The idea is to send a monthly card to another group member. The group moderator is the one who gives the assignments and themes monthly. October was the first time I participated. This is the card I sent. It is a joy fold card. The theme for the month was black and any color. I chose to keep it simple. I used black and white. This is a card that is versatile. It is elegant enough to use for a wedding. It really could be used for any occassion. If you look closely, notice the shimmer on the medallion. I used shimmer spray on it, made with alcohol and frost white shimmer paint.

post signature

05 November 2009

Embellished Paperbag Mini Albums


Here are 2 different types of mini albums I've created to hopefully sell at the craft fair. One is titled "My Peeps".. the second is titled "My Lil Princess". I was inspired by different mini albums I've seen posted all over message boards and other's personal blogs. So what do you think? I hope they sell!

post signature

It's been a while!


I've been busy getting ready for a craft fair that I will be participating in on Dec 3rd and 4th. I'm really excited, I've never participated in a craft fair before! I've been busy creating different items that I think would be things people would buy. I have this idea that people may be interested in purchasing embellished mini scrapbooks. So I've been playing with a few ideas. I will post little by little things that I create. In the mean time, here are a few cards I've made recently. The one above is a joy fold card I made for a Top SU Swaps Christmas card swap that I participated in. The only requirement was to use the following three colors: old olive, real red and chocolate chip. If you look closely at the Dasher image, you will see the shimmer paint spray clearly! I love it. I've been spraying everything with it. The card below I made using the heat & stick powder with glitter. Isn't it pretty?


post signature

18 October 2009

Update on Matchbox Die Wedding Favors


You may or may not remember back in August I shared a project I was working on. Wedding favors, stacked matchboxes, for a co-worker's daughter. The wedding was last month. My co-worker shared the wedding pictures. I was so tickled to see that the matchbox favors were part of the photographer's pictures. It was actually photographed! Awesome pictures by Mollie Jane Photography. You can view her blog if you're interested. I browsed her blog and seen lots of wedding favor ideas.

post signature

Christmas is coming quickly. . .


So with that in mind, I started creating some more Christmas cards. I've seen so many great ideas, my mind became flooded! There was one specific card that stood out in my mind. It was a card that a fellow demonstrator made for the last quarterly meeting. I wasn't sure exactly how it was made, because I didn't have the pleasure of receiving it in the swap we had that day. So I pulled out some scrap pieces of paper and decided to figure it out. All I had was a picture to go by. So, if you were the one who made this card, please let me know so I can give you credit for the inspiration! I used my circle die and cut the circle in half. The tree is made by just folding the paper back and forth.

post signature

17 October 2009

Autumn and Thanksgiving

I've been playing with many of my stamps and using different techniques to make Autumn & Thanksgiving cards. I hope you enjoy them, I really enjoyed making them!

For Card #1, I used the brayer technique. Then I heat embossed the stamped medallion image. It was incomplete until I added the "Give Thanks" sentiment. Then it was perfect!

Card #2 is a card I made for a swap I participated in. The sentiment is from my favorite Bright Blessings (wheel) that I cut apart. Inside, I used one of the leafs to decorate the side with. If you look closely, you will see that I crimped the strip of paper down the middle.


Card #3 was inspired by a card that I seen posted on Inking Idaho using the small star punch to make a wreath. I sprayed the wreath and the paper with shimmer paint spray. You can see how sparkly it is!

post signature

I'm back!

I've been really busy with lots of stuff! But, I'm back! Even though I haven't posted in a while, I've been really busy creating! I have lots to share... First of all I'd like to show you something that was once just a thought I was entertaining in my mind! I kept imagining something like this so I had to pull out all of my craft supplies and get to work! I had the idea that I'd make one for myself, my boss and other co-workers. So I started with my favorite office pal, Melissa. Her and I like to decorate our office and cubicles for the different seasons and holidays. This little halloween name plaque (not sure what else to call it!) turned out to be the cutest addition to our decorations. I used some chipboard as the base. It was really easy and fast to make. I wanted to add different textures, so I used some tulle and some metallic pipe cleaners. While I was creating, I had this idea of adding something dangly. So I added the "Boo". Ohhhh and yeah, the dies I used to cut out the alphabets we're recently purchased at a local craft store that was going out of business. Can you believe that I had my eyes on them for a few years?!?! Well, I finally got them... and for 90% off!! Wo0o0o0 Ho0o0o0!

post signature

04 October 2009

Monthly Classes

If you're local to the Inland Empire area in Southern Ca, be sure to check out my schedule of events. Upcoming classes and workshops include holiday cards, creative packaging ideas including "A Bag, A Tag and A Card" class, a workshop on creating a holiday mini album utilizing the tri shutter card technique! Check back for photos of the Tri Shutter Holiday Mini Album!

post signature

Snowman Card

Ok, looks like I've switched from Halloween into Christmas mode. I'll have to go back to Thanksgiving after I get all these Christmas ideas out of my head. Last weekend was one of the quarterly meetings for the SU group I belong to. It is the 2nd meeting that I attended. {Still a NEWBIE!} It's so exciting to meet with everyone. I come home full of inspiration and in a rush to create! After the meeting before we have lunch, we all do a swap. Before we leave, all the cards are laid out and we get to vote on the cards. There were so many awesome cards! I had my eye on this one Snowman Card, and it just so happened to be one of the top 5! I would like to thank Cheryl Braney for the inspiration, I decided to CASE it this weekend... here is my own version of the snowman card. . .

post signature

02 October 2009

Off Topic

Just thought I'd share a picture of my beautiful daughter, Vanessa Michelle. During the 3 years of her having her braces on, she rarely allowed herself to be photographed showing her mouth full of metal! On September 11, 2009, she finally had her braces removed. It was such a memorable day for more reasons than just her braces coming off. So, I told her she had no choice, that I just had to take a picture of her. Here she is....

post signature

30 September 2009

Thanksgiving Card Share


I'm having so much fun with all the stamps I cut out of the Bright Blessings Jumbo Wheel Stamp!! I love the sentiments... People have asked which set the sentiment on this card and the PPA9 challenge card belonged to. I shared my little secret with them... that I cut 10 stamps from 1 wheel! I have to admit, it wasn't originally my idea. Here is the link to the blog on which I first seen the idea: How to turn a SU Jumbo Wheel into a set of 13 stamps. Give it a try, I'm sure you'll love the results! When I seen it, I thought I'd have to find a wheel with words on it that I could cut apart. Thanksgiving was coming, and I had no Thanksgiving stamps! When I was browsing the catalog, I thought that this wheel would be perfect for cards of many sorts! The leaves are also from the same wheel. Our in-colors are perfect for all your autumn/fall/Thanksgiving craft needs.

post signature

25 September 2009

PPA 9 - Inspiration Challenge


Picture Perfect Inspiration - Pals Paper Arts Challenge Blog, This weeks challenge was inspired by the above picture from Pottery Barn. I immediately thought of entering the challenge because I just finished creating the card below for a swap tomorrow! Anywho, I LOVE the medallion stamp!! For this card, I simply cut it in half. The sentiment I chose was from the Bright Blessings Jumbo Wheel 115626. I took the rubber off the wheel and cut it apart, creating 10 stamps!! Hope you enjoy... and thanks for looking!

post signature

23 September 2009

TOP SU SWAPS

It's not quite October yet, and I think I am done with Halloween. LoL. What I mean is that I started really early with all my Halloween creations. Recently, I joined a yahoo group called TOP SU SWAPS. I wanted to expand my networking and join some challenges and swaps. These were 2 fairly easy cards that I made to swap with 5 of the other ladies in the group. I couldn't help myself, I had to make another card with the cute round tab bat!!
This was the first "Christmas" card I've made so far. So now I can say that I am creating for Christmas in September. I really would've loved to start in July!!

post signature

Halloween Theme Class


This is one of the items that was made in my Halloween Theme Class. We had a special treat for this class. I had a guest, Teresa, from Colorado attend. She was visiting her mother here in CA. Teresa did a search on the SU website and found me! She then searched the calendar on my DBWS and seen that I was holding a workshop when she was visiting. I was really excited that she came! There were 3 cards and two 3-D items made. This little treat basket was a hit. The sentiment, "It's Halloween, Enjoy every bite!" was perfect! The basket itself was made using the pieces from the basket & blooms SU die. It was modified to make this basket, opposed to making it how it was intended (round & much smaller). We used Cast-A-Spell DSP and the Twick or Tweet Stamp Set 116497.
*I would like to give credit to Chiaki Haverstick for teaching me how to make this basket. I attended her "Non-traditional Packaging" class a few months back.
If you're in the So Cali area, and would like to come to future classes/workshops, feel free to check my calendar for upcoming events!

post signature

19 September 2009

Card for a friend...


This is a card that I created for a fellow demo who has become a great friend of mine! The card had a dual purpose, first to wish her a happy birthday and secondly to thank her for her generosity. I am very thankful to have met her! She even picked up items from Memento Mall at convention for me, fulfilling my wish list! Since I couldn't make it, she made my day by bringing me back the items... what would I do without a friend like that?!?! This card is made using the Eastern Blooms Stamp Set 111626, Soft Suede Classic ink, Soft Suede CS, Crushe Curry CS, Old Olive CS and Whisper White CS.

post signature

Busy, Busy, Busy!

Just wanted to post to say that I've strayed from my attempt at consistent posting to my blog! Seems like there is a lot going on these days! I will post the projects that I have been working on... lots of creativity flowing from my mind to my hands... into the creations that I've been making!

post signature

01 September 2009

The NEW Holiday Mini Catalog is HERE!

Need a FREE copy? Email me: (arvizulet@aol.com) your name and US address. I will then mail you one! Simple as that! Click on the Holiday Mini icon on the left here on my blog... -OR- click here to download it. Enjoy!

post signature

30 August 2009

Halloween Theme - PPA5


Today I was feeling creative so I decided to participate in the PPA 5 - Halloween theme challenge at Pals Paper Arts. I was inspired by my upline, Janet Dietzman. She made a joy fold card for the swap at her last downline meeting. You can find a tutorial for the Joy Fold Card here. As you can see, I couldn't resist using the round tab punch bat again! Hope you enjoy! Thanks for looking...
Here is a close up of the card, opened.

post signature

Another Entry for LNS Challenge #34


I had to submit one more entry for LNS Challenge #34. I hadn't seen anyone submit an entry for a purse like this. This cute little purse is made using the round tab punch. The handle is made using the large oval punch and the scallop oval punch. I also used a portion of the oval punch to make the flap on the purse. I finished off the card by stamping the sentiment and punching it out with the modern label punch.
Hope you enjoy!
SU Punches used:
Round tab 108340
Lg Oval 107305
Scallop Oval 114889
Modern Label 116630
SU Supplies used: Whisper White CS, Melon Mambo Textured CS, Melon Mambo Patterns DSP and Melon Mambo classic ink.

post signature

25 August 2009

How to make a Round Tab Punch Bat


Ok Stampers, here is a picture of how you can make a bat using the round tab punch. A picture is worth a thousand words... and it would've taken me one thousand and ONE words to explain... so here ya go! Enjoy creating with this versatile punch! Come back and share what you create... If you have any questions, feel free to ask!

post signature

LNS Challenge #34


This is a quick and easy Halloween card that I made for the LNS Challenge #34. The challenge was to use punches to create a card. I used 3 for this card: Round Tab Punch 108340, Curly Label Punch 112208 and 1 3/8" Circle Punch 104401. I used Cast-A-Spell DSP 115677, Basic Black CS 102851 and Only Orange CS 102837. The greeting I used is a sneak peek from the holiday mini catalog: Grateful Greetings 116511. I would love to take credit for creating the bat on my own, but I actually got the idea from a swap that was from Convention. I went to a fellow demo's open house, she had display boards full of swaps! I snapped a few pics and decided to CASE the bat. So whoever initially made it, thanks so much for the awesome idea! There are so many people out there who totally think "out of the box" and find new and creative ways to use punches!!
Here is a close up of the bat! I sponged the edges with white craft ink so that it stood out a little more since the "moon" behind it was a little smaller than it was! Then I added the "googly eyes". Hope you enjoy!

post signature

22 August 2009

PPA4 - Anything BUT A Card


I created this Halloween Banner for the Pals Paper Arts Anything BUT A Card - PPA4 challenge. I almost didn't participate because I couldn't get a good picture of my project. I guess it was too big! (Click on the image to see it even more close up.) So, I laid it down and arranged all the letters close together. Although you can't see how nice it looks hung, you can still see the details. I used the SU Scallop Square die 115950 to cut out the background material. I then adhered it to orange canvas with fusible webbing. I strung it all together with black gingham ribbon 104832. The letters were cut out with my Cricut, using the Alphalicious cartridge. I embellished it with white rick rack, a few orange buttons, bling, ribbon and tulle. I am having a lot of fun making these banners! You will be seeing many more with all the upcoming holidays! Also, if you are in the area and are interested, I will be having a Banner Making Workshop soon! Contact me for details.

Here is an even closer look at one of the blocks:

post signature

Inspiration

This past Tuesday, Aug. 18th, I met with a group of ladies that I stamp with once a month. Every month the ladies take turns and someone new "teaches". This time it was my upline, Janet Dietzman's, turn! We made 3 cards that were all variations of cards that were posted on Patty Bennett's blog. Patty is such an inspiration to all SU Demo's!! I know I aspire to be as creative and successful as she is!!

Card #1 was made using SU's die-cut Pendant Notes 116449. They are perfect for quick and easy cards that can be dressed up to look elegant or left simple. We also used Bridesmaid 116479 Specialty Paper. This paper added elegance with it's foiled texture. Perfect for weddings! You can check out Patty's version here on her July 25, 09 post.

Card #2 was made using the watercoloring technique with the Rose from the Fifth Avenue Floral 113734 stamp set. You can find the watercolor roses technique and video tutorial here on the April 26, 09 post. This was also my first attempt at watercolor roses! After I was done, I realized I hadn't done the technique right. I'll have to try it again to get the full effect of the beautiful colors!


Card #3 was made using 2 of SU's background stamps: Medallion 115223 and French Filigree 113742. I was so excited to get to use the Medallion Stamp. It will definitely be one of the next stamps I purchase! The size of the stamp allows you to use it as a whole or to cut out a portion of it to use as a layer. On this card, we used a round scallop circle and one of the circles from the Circle Circus 115778 stamp set to layer. You can find Patty's card here.

post signature

15 August 2009

Matchbox Die Wedding Favors


One of my co-workers has a daughter getting married next month. I overheard her and another co-worker planning the wedding and discussing wedding favors. I came over and offered to bring in some samples. She took them to her daughter, along with a catalog to choose colors. She especially loved the matchbox... she decided on using 2 stacked for each place setting, we made approximately 330 of them (she needed enough for 165 place settings!!). She chose a variety of SU colors including Melon Mambo, Soft Suede, Old Olive and Very Vanilla. These are 2 of the different ways we created them. The different colors of CS and ribbons all look beautiful together! The bride and groom to be were very pleased with the finished boxes. Even he helped with the assembly!

post signature

09 August 2009

"Faux" Bow

Since I posted the card I made for the PPA2 sketch challenge, I have been asked how I created the bow above. The bow is a "faux" bow.... Hopefully I can explain it without confusing you all, sometimes I tend to complicate simple things!

You will need 3 pieces of ribbon, 1 piece long enough to go across the CS you are covering, 1 smaller piece to create the looped "bow"and 1 smaller piece for the gathered part you place over the "loop".

1. The 1st piece of ribbon will need to have adhesive behind it, you can either do that now or wait to you complete the other steps. Make sure to add adhesive to the ends so that you can tuck them behind the cardstock. DO NOT adhere to CS yet.
2. With the 2nd piece of ribbon, you need to join the ends together to make the loops. I put my adhesive behind the middle of the ribbon then just tucked the ends behind. This piece can be adhered to the longer strip now.
3. Next, take the 3rd piece of ribbon and with a thin thread/twine, tie the middle section to create the gathered look. Center the gathered piece over the middle of the looped piece of ribbon. Now tuck the ends behind, adhering it to the looped part. Cut any excess ribbon off.
4. Finally, you can adhere the strip of ribbon to your CS.

If you have any questions, feel free to contact me...

post signature

06 August 2009

Pals Paper Arts Simple Sketch Challenge


This is the PPA2 Simple Sketch Challenge. This is my first time participating. I am going to love playing along at PPA! I'll have to participate weekly since it was so much fun! Play along at: Pals Paper Arts. The Pals Paper Artist Picks will be announced on Wednesday, August 12th.
SU Supplies used: Soft Suede CS, Rose Red Patterns DSP, Thoroughly Modern DSP, Whisper White CS, Soft Suede Classic Ink, Melon Mambo Classic Ink, Soft Suede Polka Dot Grosgrain Ribbon, Circle Punch, Curly Label Punch, Top Note Die, Wings of Friendship Level II Hostess Set, Clear Rhinestone brads, Stampin Dimensionals and Paper Piercing Tool.

Other supplies used: Bazzill Basics Paper Flowers, Rhinestones

post signature